
We lost power Tuesday night around 9 o'clock, right after watching a few episodes of
Firefly. There was a storm coming through outside, but it whipped through so quickly that it barely registered on our eyeballs before it was gone. Like lightning.
Unfortunately, the wind or the lightning did enough damage to the power lines somewhere around the area that our power was out for much longer than we anticipated. We've had power go out before, but it usually returns within four to six hours. This time, it took twenty.
Mind you, I'm not complaining. I rather enjoyed the experience, outside of the anxiety of worrying if the food in the fridge was going to go bad and the anxiety of worrying if the sump was going to flood the basement. (Had it been a Katrina-sized event, I'd have a lot more to worry about.)
It was an excellent opportunity to find out just what kind of emergency supplies we had at the house, and how much energy we could get by on. In the first hour, we managed to locate all the flashlights in the house, along with a dozen or so candles. The house was lit like an old-style Christmas card, just beautiful from within. And we all got to bed on time, for a change, since there was no point in staying up just to stare at the flickering lights.
And after all the showers, the hot water was gone, too.
It was a bit more worrisome in the morning when we discovered that the power was still out, and we couldn't find out if the high school was open or not, and James needed to be there early for band practice. The phone directory, which had the telephone number for the school district, was stored in the wireless phone, but it wasn't working anymore. The number we had in the yellow pages wasn't working either, but we weren't sure why. So we took James to school, and as we drove around the neighborhood, we discovered that the power outage was highly sporadic. Some of our neighbors around the corner still had power. Entire neighborhoods nearby had none; yet immediately after those, as we drove along the road to school, we found others fully lit.
James got to school - I couldn't tell if he was excited to be there or not! - and the rest of the kids went off to their respective buses when the time arrived. Cheryl had a dental appointment, so off she went. Eventually, no one was left but me. Before going off to work, I bailed out the sump drain, just in case the groundwater decided to rise.
Around lunch time, I headed home to see if (1) the sump was filling up; and if (2) the food in the refrigerator was getting warm. Stopped by the store to pick up a couple bags of ice for the cooler, just in case. At home, the situation hadn't changed. No power. So we put the perishables in the cooler and then I whipped together a backup power system from a couple batteries I had lying around so we could get the DSL router going and check the internet. And try charging up the wireless phone.

Also pulled out my solar array panel so I could charge up one of the old lead-acid batteries for additional backup. Nifty panel. In full sunlight, it got 13.5 volts, which was enough to quick-charge the battery in about four hours.

The kids were disappointed to find the power still out when they got home in the afternoon, but we made the best of it, finding interesting chores for them to do. After all the chores were done, James went on a bike ride and Mary drew chalk art on the driveway and Adam read a book and Deb did something else.
Then the power returned, and life returned to normal.
Just in time for dinner.
==
Mary did a curious thing tonight. After the power came back on, I was out in the garage preparing some boards for cutting, and she walked up to me and said she needed me to show her how to use the saws.
"Why?" I asked.
"Because I want to build a table for my doll house," she replied. And she looked down on the workbench and saw a thin block of wood which was just about the perfect size for the table top.
"Can I have that?" she asked. "Sure," I said. Then I showed her several different ways to cut some table legs out of some other scraps, including the hobby saw, the mitre saw, the band saw, and the compound mitre saw. She preferred the band saw, because it cut fast.
When it came time to put it all together, she was thinking of using nails, but I persuaded her to use glue instead, for the sake of an unblemished table top. "It just wouldn't do to have the nail head sticking up through the table top." She accepted my point, but still thinks it would be sturdier with a nail in there somewhere. I told her I'd ship her out to Grandpa's for the summer and he could teach her all about making furniture. She thought that would be great fun!


After we got the table put together, she helped me carry some particle board scraps up into the attic so I could use them for walking on, and then it was time for dinner.
What a fun day!
 It's the thing to do when the grandparents arrive: work on some house project. This week it's the chair rail and the stencils in the formal dining room. Cheryl's been looking forward to this 'upgrade' for a long time. Really adds some character to the room. She already spent a week or so getting the room painted, now she's up on a ladder stenciling the ceiling while her dad measures, cuts and installs the chair railing.
 It really makes the room like nice. Ready for another formal dinner. Which we haven't had in a long time, probably since Seder. It's been used as a craft room ever since then, which means it's been jammed up with scrapbooking stuff and painting odds and ends. Now it's looking nice.
 I like the stencils. Adds some nice flavor to the room.
 Even looks nice with those red curtains.
 How she managed to do it while standing on a relatively short ladder, is beyond me.
 Mary had a nice birthday, although she would rather have opened the presents earlier this morning instead of waiting until after dinner. But we didn't have all of them wrapped this morning, and we wanted her to focus on her schoolwork during the day rather than the gifts. Not sure if it worked. But she enjoyed the cards, the cash, and the gifts.
 Inspired by all the fun I was having building platforms at the church, and wondering if perhaps one of the boys might want to migrate to the basement during the grandparents' visit this week, I decided to have a little more fun and devise a method for putting a door in the basement room which will one day be James's primary residence.
 The slot was more difficult since it had to start 1-1/2 inches from the pivot point and continue on to the other end. But I eventually figured out to drill another 1/4-inch hole at the starting point and then use the table saw to cut the slot from that point forward. For a prototype, it's not too bad.


 There are many things a congregation can do when their old auditorium is no longer used for corporate worship because they have built a new one. Seven or eight years ago, the congregation to which we belong completed phase 1 of a 3-phase expansion which included a very nice multi-purpose auditorium. Due to various reasons, most of them related to the downturn in the general economy in Michigan, the money for phases 2 and 3 never materialized. The old auditorium, out-dated and in woeful need of repair to various infrastructural items (heating, electric, plumbing) has been in the process of transformation into a Youth Ministry Center for several years now.
 She spent the weekend painting the dining room, turning the dull, drab tans into very nice shades of green. How she did it while dealing with a cold at the same time, I don't know. She's an amazing woman! She got the girls to help her unload the hutch of its treasures, and we moved it into the center of the room; then, when all that was done, we moved it back so she could do some trim work on the ceiling.
 While she was at it, she also painted the little alcove known as the 'butler'. She's got some plans going on for the living room while her folks are out visiting this week, something about some chair rail or decorative trim or something. I have no idea where she gets all that energy!


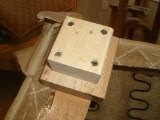
 The first task was to (1) find the center of the 2x4 blocks; then, (2) mark it; then, (3) drill a countersink hole and then the hole for the bolt to go through; then, (4) take the bolts and cut a slot in the top so that they could be screwed down tight into the base plate.
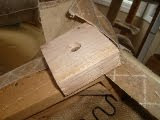 Finally, I put the leg onto the base plate to see how it looked.
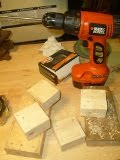

 We knew it was going to happen one of these days; in fact, we've been expecting it since the first time she started squinting when looking off in the distance. It only makes sense, after all, since she is the offspring of parent who both have one astigmatism or another.